Turn six blanks into a set
Practice straight pull-saw cuts, then decorate the resulting wood pieces as characters, symbols or a themed collection. The pieces do not need to be identical. Aim for controlled cuts, safe edges and an intentional design.
The source estimate is about 30 minutes. Your class may need extra time for the tool demonstration, teacher checks and decoration.
Skills you will practice
- Using a combination square to transfer consistent layout marks.
- Distinguishing rip cuts along the grain from crosscuts across it.
- Using a secure rip-and-flip workholding sequence.
- Turning material differences into design choices.
Starting stock and layout
- One teacher-approved pine blank, 12″ long × 5½″ wide, with its actual thickness measured. Expected class stock is approximately ¾″ thick, subject to that check.
- Combination square, pencil, pull saw and markers for decoration.
- Teacher-provided vise or hold-down and safety goggles. Fine sandpaper is a finishing addition for this guide.
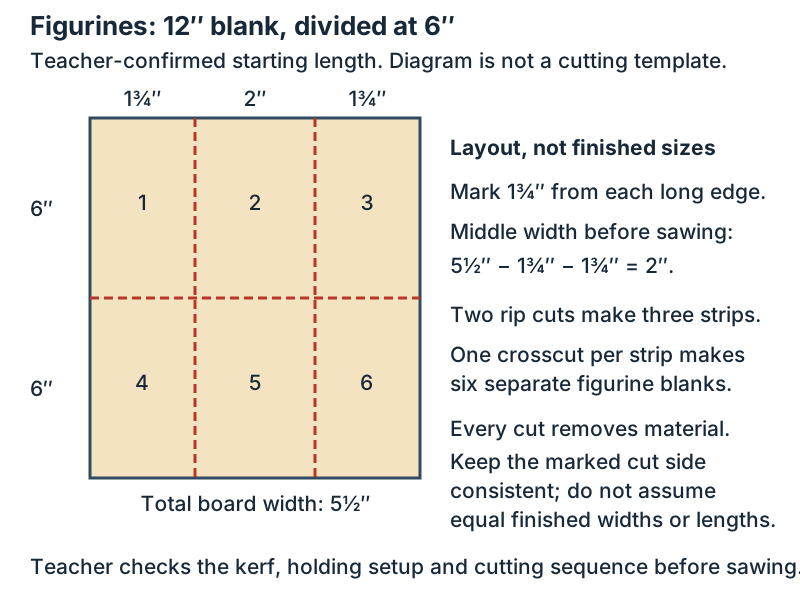
The class plan uses a 12″ blank with a crosswise mark at 6″. The two lengthwise layout lines are each 1¾″ from a long edge. Use the combination square against the opposite edge for the second line.
| Feature | Mark or calculation |
|---|---|
| Starting blank | 12″ × 5½″ |
| Crosswise division | 6″ from one square end |
| Two lengthwise lines | 1¾″ from each long edge |
| Middle section before sawing | 5½″ − 1¾″ − 1¾″ = 2″ |
| Resulting quantity | 3 strips, each crosscut into 2 pieces: 6 pieces total |
This is not a promise of equal finished pieces. The outer layout bands are 1¾″ wide, while the middle is 2″ before cutting. The two rip cuts remove additional material. A crosscut at 6″ also removes material, so the two resulting pieces are not automatically both 6″ long. Keep track of which side of each mark takes the kerf.
Prepare the saw station
- Wear safety goggles. Inspect the saw and workholding with the teacher.
- Use the teacher-identified teeth for rip and crosscuts. Never change the saw side while the blade is moving.
- Secure the stock and keep fingers clear of the cut. Do not hand-hold a short or unstable piece.
- For rip-and-flip, stop sawing, remove the blade from the cut as directed, release the workholding and turn the board. Re-clamp and check the cut before continuing.
- Pause when a strip gets narrow or a crosscut leaves a small offcut. The teacher must approve that holding arrangement.
Make and decorate the pieces
Inspect and plan.
Find knots and cracks. Sketch how six pieces could become a coordinated set. Keep the basic cuts straight; shaped outlines need a separate approved extension.
Measure the stock.
Confirm the blank is 12″ long and 5½″ wide. Measure its thickness. If the width differs, stop and have the teacher revise the layout before setting out the lines.
Lay out the six sections.
Set the combination square to 1.75″, which is 1¾″. Mark one line lengthwise from one long edge and a second from the other long edge. Draw the crosswise line at 6″ using a square end as the reference. Extend the needed reference marks onto both faces so they can be checked after turning the board.
Check before the rip cuts.
Label your reference end and the teacher-approved cut sides. Secure the board with the lines visible. Ask the teacher to check the setup before starting either long cut.
Rip and flip under supervision.
Follow a lengthwise line using controlled pull-saw strokes. The source recommends alternating the view of the cut every few inches to reduce blade tilt. Use the stop, release, turn and re-clamp sequence above. Repeat for the second rip cut. You should now have three strips, with widths affected by the saw kerfs.
Crosscut each strip.
Check the 6″ reference on each strip. Use the approved holding setup and crosscut teeth, keeping the blade on the agreed side of the mark. One crosscut per strip produces six separate pieces. Support the remaining piece; do not reach into the blade path as it separates.
Make the edges safe.
Inspect for splinters, rough cut faces and cracks. Sand as directed. Check that a figure intended to stand can balance on its chosen base. Do not force a thin or cracked section into service.
Decorate with intent.
Use pencil for the main design, then add marker details. Let the wood’s shape inform the character or symbol. Use repeated colors or features to make the six pieces read as a set.
Quality check and cleanup
- Count the pieces and check each for sharp or splintered edges.
- Compare the actual widths and lengths. Explain the effects of the original layout and the saw kerf instead of labeling every difference a mistake.
- Check that decorations are dry and any standing pieces are stable.
- Return tools, collect offcuts and clean the station using the classroom routine.
Reflection and optional extensions
Which cut was closest to square, and what helped? Choose one figurine and sketch a revision. Explain how you could plan more consistent finished widths while still allowing material for the saw cuts.
Optional extensions
Create a coordinated set with a theme or a short written character description. A shaped silhouette is a separate teacher-approved cutting task; it is not part of the basic straight-cut activity. More decoration does not require more cutting.