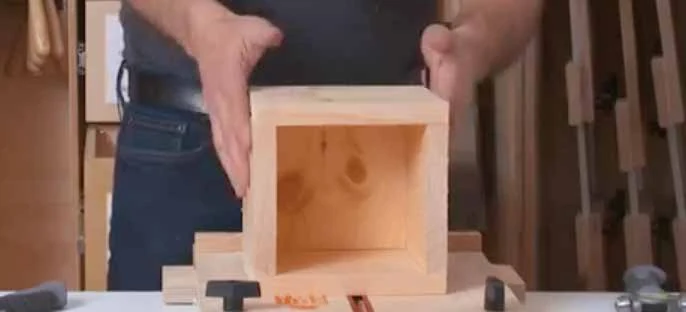
Build a useful box
Make an open-top pine box with a bottom, two short sides and two overlapping long sides. Your goal is a square, stable box with flush edges and no exposed nail points. A lid is an optional extension.
Plan for about 100 minutes across two sessions: layout and cutting first, then remaining cutting, fitting and assembly. You should already have practiced safe pull-saw use, as in the source program’s Tower Blox activity.
Skills you will practice
- Inspecting stock and reading fractional-inch measurements.
- Marking square cut lines and accounting for saw kerf.
- Dry-fitting parts, locating joints and planning a safe assembly sequence.
- Controlling a hammer and checking the quality of your work.
Materials, tools and cut list
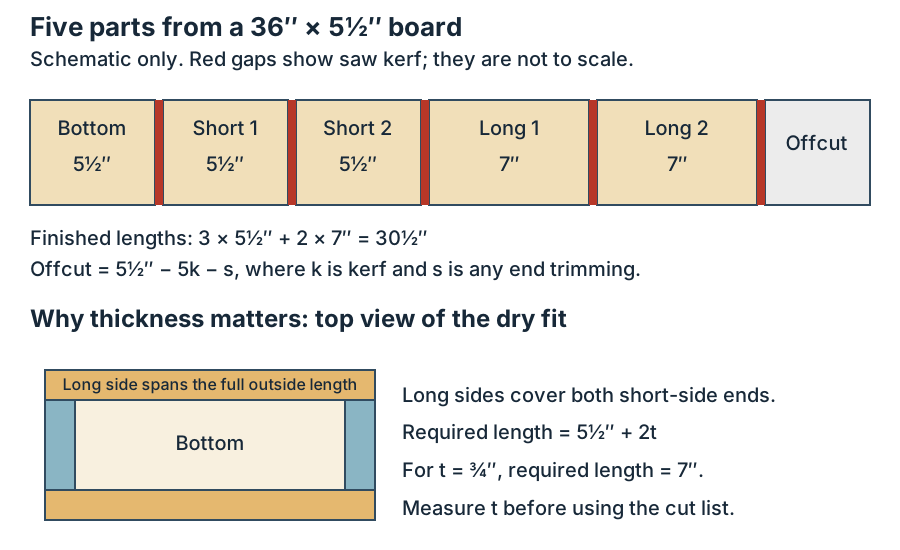
- One pine board listed by the source as 36″ long × 5½″ wide. The cut list below requires measured ¾″ stock thickness.
- Approximately 24 3d nails. The teacher must approve the supplied nail type and actual length for the joints.
- Pencil, combination square, measuring tape, pull saw, hammer, hold-down and woodworking station with a suitable vise.
- Safety goggles. Optional: sandpaper, wood glue, decorative supplies and a teacher-approved block plane.
The source’s tools table lists the measuring tools, hold-down and goggles; the saw, hammer and vise are also used in its illustrated procedures.
| Part | Quantity | Finished face size |
|---|---|---|
| Bottom | 1 | 5½″ × 5½″ |
| Short sides | 2 | 5½″ × 5½″ each |
| Long sides | 2 | 7″ × 5½″ each |
The short sides stand outside two opposite edges of the bottom. Each long side then covers a bottom edge and the exposed ends of both short sides. It must span 5½″ + twice the side thickness. That equals 7″ only when the stock is ¾″ thick.
Finished part lengths total 30½″. Five separating cuts consume five kerfs. From a 36″ board, the theoretical offcut is 5½″ − 5 × kerf − any end trimming. Do not treat the full 5½″ as usable leftover wood.
Set up safely
- Wear goggles for sawing and hammering. Check that the saw and hammer are in sound condition.
- Secure the wood with the teacher-approved hold-down or vise. Keep hands clear of the blade and support the offcut.
- Stop before adjusting the clamp, turning stock or changing your grip. Ask for help when the remaining board becomes too short to hold securely.
- Keep fingers out of the hammer path and away from the back of a board being pre-nailed. Treat exposed pre-nailed tips as sharp points.
- Stop if a nail bends, the wood splits, a tip emerges in the wrong place, or the work shifts. Have the teacher help correct it.
Measure, cut, fit and assemble
Inspect the board.
Find knots, cracks and damaged edges. Avoid placing a cut or joint through a large knot. Ask for different stock if the sound areas will not hold all five parts.
Measure and cut the bottom.
Check that the starting end is square. Measure 5½″, place two pencil marks and connect them with the combination square. Identify the waste side. Use the teacher-identified crosscut teeth of the pull saw and keep the blade’s kerf on the waste side so the finished part keeps its marked length. Label the piece B and add your initials lightly.
Make the two short sides.
Check the bottom’s actual size and squareness before using it as a template. Mark a short side from the newly cut end of the remaining stock, cut it, and repeat. Label the parts S1 and S2. Do not copy a mistake into the next part.
Make the two long sides.
Measure 7″ from the next square end and cut the first long side. Check it before using it as the template for the second. Label them L1 and L2. Remeasure from a fresh end each time; five lines drawn without kerf allowance will not produce the listed finished lengths.
Dry-fit all five parts.
Place the bottom flat, fit the two short sides against opposite edges, and place the long sides over the remaining edges and the short-side ends. Check that the bottoms align and the corners meet at 90°. Mark any corrections; do not force a poor fit together with nails.
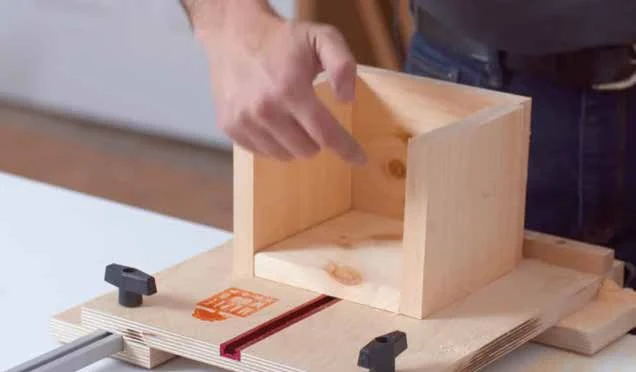
Maplewoodshop Keepsake Box project, PDF page 7: dry-fitting the parts. Mark the joining bands.
Hold each mating piece in its final position and trace where its edge meets the outside face. These bands show where a nail can enter the adjoining board. Mark one bottom-edge joining band on each short side, and three bands on each long side: one for the bottom and one at each short-side end.
Mark nail positions.
Place three evenly spaced marks inside each joining band, with suitable clearance from corners and edges. Each short side receives three nail marks; each long side receives nine. That gives approximately 24 nails altogether. Have the teacher check spacing and alignment.
Pre-nail the four sides.
Use the teacher’s supported setup. Start the nails on their marks until the tips only just appear through the back, as the source demonstrates. Keep the underside clear of fingers and protect the bench with the approved backing. Do not carry or leave these pieces with sharp tips pointing toward someone.
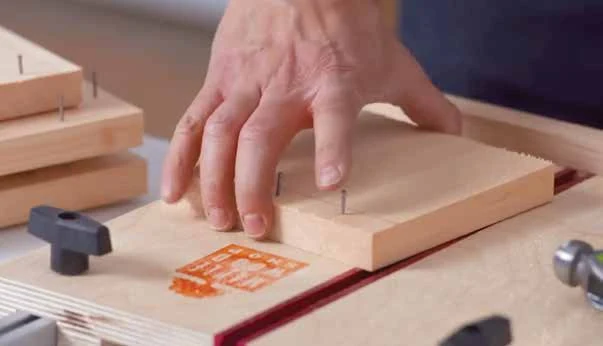
Maplewoodshop Keepsake Box project, PDF page 8: pre-nailing. Attach the first short side.
Secure the bottom in the front vise with the joining edge level with the station, as demonstrated by your teacher. Align the short side with that edge, check the 90° corner, and drive the three nails. Check for splitting or misplaced points.
Attach the second short side.
Remove the L-shaped assembly from the vise and set it on the work surface. Attach the opposite short side using the source’s supported, out-of-vise setup. Ask for teacher help stabilizing it; a helper’s hands must stay out of the hammer path.
Attach the first long side.
Cover the bottom edge and both short-side ends. Feel for flush edges. Start with the middle nail in each of the three joining bands, recheck alignment, and then drive the remaining nails.
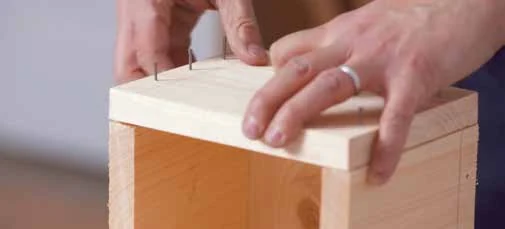
Maplewoodshop Keepsake Box project, PDF page 10: the long-side overlap. Attach the last long side.
Repeat on the other side. Keep checking the corners as you work. The completed basic box has five pieces and an open top.
Finish, inspect and clean up
- Have the teacher inspect the inside and outside for sharp nail points, bent nails, splits and loose joints.
- Check that the box sits flat and that the top rim and corners align. Correct unsafe defects before using it.
- Sand rough edges with the grain and remove splinters. Use a block plane only with separate teacher approval and instruction.
- Add paint or other approved decoration if time allows. Follow the finish label and classroom ventilation rules; let it dry before handling.
- Collect nails and offcuts, return tools and clean the bench using the classroom’s dust-cleanup routine.
Reflect and redesign
Identify one measurement or assembly choice that affected the result. Sketch a revised box and explain which dimensions would have to change. Show how you would include kerf in the next cutting plan.
Optional extensions
A fitted lid is a separate design task using suitable scrap, after the basic box passes inspection. Measure the completed opening rather than assuming a size. A hinged lid, stop and lifting hole require an approved plan and separate tool supervision. Decoration or a different box proportion is also optional; neither is required to complete the basic project.